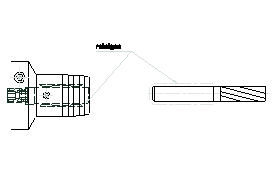
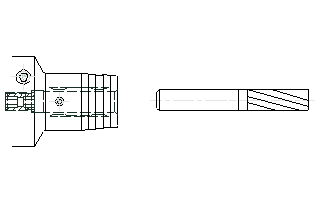
Hydraulic Chuck
Hydraulic chuck for automatic tool change with axial adjustment of length
for metal and wood processing machines with rotating cutting tools
If used properly you achieve highest accuracy of cyclic running and
repeatability and high transferable torques. The chucks are easy to
use and maintenance free. Using reducing sleeves you achieve a
high degree of diameter flexibility
(safe transferable torques see below).
- material 1600 -1800 N/mm2
- hardness 52+2 HRc
- tool holders are balanced as mentioned in the catalogue, respectively on request
- maximum revolution 40000 rpm
(observe the rpm limits of the interface, balancing recommended!)
- best operating temperature 20 - 50°C, higher temperatures on request,
not higher than 80°C
- maximum coolant pressure 80 bar
- range of adjustment of length 10 mm
- usable shafts (tolerance h6) with and without reducing sleeves
DIN1835A, DIN6535HA, DIN6535HAK from Æ 3 to 32 mm
DIN1835B, DIN6535HB, DIN6535HBK up to Æ 20 mm
- usable shafts (tolerance h6) only with reducing sleeves
DIN1835B, DIN6535HB, DIN6535HBK > Æ 20 mm,
DIN 1835D/E, DIN 6535HE, DIN6535HEK
2. Insert tool up to adjustment screw.

3. Adjustment of the tool length by turning the adjustment screw
with the Allen-T-wrench. Please observe the minimum clamping
depth.
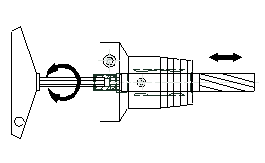
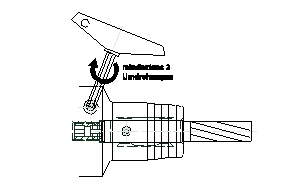
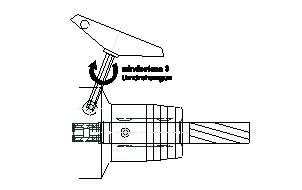
4. Screw the clamping bolt to the stud carrying out the minimum turns
(see point c.) and tighten it slightly using a torque of 7 Nm.
5. To release the cutting tool please turn the clamping bolt
3 to 7 turns counter clockwise. (Caution: The clamping bolt
can fall out if turned too far.)
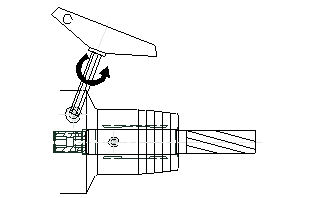
6. Take out the tool.
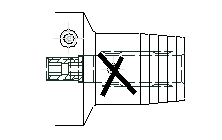
b. Do not clamp the hydraulic chuck without a tool and store it
in unclamped position.

c. Referring to the clamping point from that on you can no longer turn
the tool by hand you have to carry out the turns mentioned in our
table to clamp the tool tightly (to the stud). If you cannot carry out
enough turns do not use the chuck any more and send it back to our
repair service. Do not handle the tool cutting edge you may be hurt.
d. Working with hydraulic chucks you have to use safety covers
conform to the EEC Machine Guide Line § 1. .4.2.2.B.
e. Additional modifications and extensions are not allowed without
the written consent of the manufacturer.
2. The clamping bolt should be lubricated regularly.
for metal and wood processing machines with rotating cutting tools
Technical Data
Hydraulic chucks are produced according to DIN 69882-7; 2002-4.If used properly you achieve highest accuracy of cyclic running and
repeatability and high transferable torques. The chucks are easy to
use and maintenance free. Using reducing sleeves you achieve a
high degree of diameter flexibility
(safe transferable torques see below).
- material 1600 -1800 N/mm2
- hardness 52+2 HRc
- tool holders are balanced as mentioned in the catalogue, respectively on request
- maximum revolution 40000 rpm
(observe the rpm limits of the interface, balancing recommended!)
- best operating temperature 20 - 50°C, higher temperatures on request,
not higher than 80°C
- maximum coolant pressure 80 bar
- range of adjustment of length 10 mm
- usable shafts (tolerance h6) with and without reducing sleeves
DIN1835A, DIN6535HA, DIN6535HAK from Æ 3 to 32 mm
DIN1835B, DIN6535HB, DIN6535HBK up to Æ 20 mm
- usable shafts (tolerance h6) only with reducing sleeves
DIN1835B, DIN6535HB, DIN6535HBK > Æ 20 mm,
DIN 1835D/E, DIN 6535HE, DIN6535HEK
| clamping diameter | minimum turns | min. Clamping depth | safe transferable torque |
| 6mm | 2 | 27mm | 20Nm |
| 8mm | 2 | 27mm | 35Nm |
| 10mm | 3 | 31mm | 45Nm |
| 12mm | 3,5 | 36mm | 80Nm |
| 14mm | 4 | 36mm | 100Nm |
| 16mm | 4,5 | 39mm | 130Nm |
| 18mm | 5 | 39mm | 180Nm |
| 20mm | 5 | 41mm | 210Nm |
| 25mm | 6 | 41mm | 350Nm |
| 32mm | 6 | 51mm | 450Nm |
Operating instructions
1. Clean the tool shaft and the clamping bore (free from grease) and check them for damage (dot not use damaged components).2. Insert tool up to adjustment screw.
3. Adjustment of the tool length by turning the adjustment screw
with the Allen-T-wrench. Please observe the minimum clamping
depth.
4. Screw the clamping bolt to the stud carrying out the minimum turns
(see point c.) and tighten it slightly using a torque of 7 Nm.
5. To release the cutting tool please turn the clamping bolt
3 to 7 turns counter clockwise. (Caution: The clamping bolt
can fall out if turned too far.)
6. Take out the tool.
Caution!
a. The bleeder screw is sealed and must not be opened.b. Do not clamp the hydraulic chuck without a tool and store it
in unclamped position.
c. Referring to the clamping point from that on you can no longer turn
the tool by hand you have to carry out the turns mentioned in our
table to clamp the tool tightly (to the stud). If you cannot carry out
enough turns do not use the chuck any more and send it back to our
repair service. Do not handle the tool cutting edge you may be hurt.
d. Working with hydraulic chucks you have to use safety covers
conform to the EEC Machine Guide Line § 1. .4.2.2.B.
e. Additional modifications and extensions are not allowed without
the written consent of the manufacturer.
Maintenance and cleaning:
1. Protect the hydraulic chuck against corrosion before storing.2. The clamping bolt should be lubricated regularly.